| Table of Contents | ||
|---|---|---|
|
...
First, you we need your our tree in a form where you we can easily work with it – typically, a simple text-document format on a computer. If you’re we’re working with an online tree-testing tool, this will also let you us easily copy your our finalized tree into the tool later.
(While you we can prepare your our tree directly in your the tree-testing tool, we’ve found that this is usually slower and fussier than working in a dedicated document app first.)
...
While either of these will work, we recommend using a spreadsheet instead, because:
- The separate columns make it easier to see which level a given heading is on, and to make sure you we haven’t accidentally skipped a level.
- You We can include several trees (e.g. the baseline tree and some revised versions) in a single spreadsheet by using the page tabs.
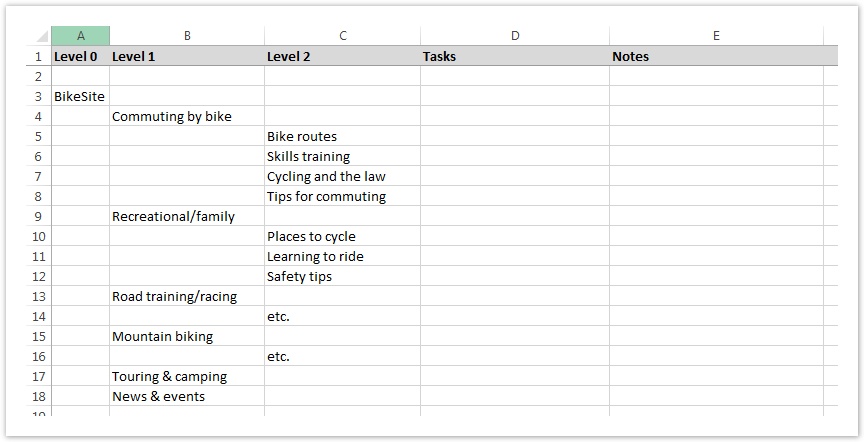
- Most importantly, you we can add columns to annotate your the tree. In the screenshot below, we’ve added columns for Tasks and Notes.
If you’re we’re working alone, we usually just use your our favorite spreadsheet program (e.g. Microsoft Excel, Apple Numbers, etc.).
However, if you’re we’re collaborating with others, we highly recommend using a online spreadsheet (such as Google Sheets) that provides multi-user editing. This lets everyone stay current and contribute without having to email files around and manually consolidate changes later.
Here are sample files in Excel and Google Sheets formats to help you get started. Feel free to tweak them to suit your needs:
| File | Format | Description |
|---|---|---|
| Microsoft Excel | ~description |
| Google Sheets | ~description |
A few notes about our spreadsheet template:
- The first column is reserved for the root node of the tree, so it only has a single entry, typically labeled “Home” or “Top”, but you we can rename it to whatever suits your our site.
- We’ve included 5 levels, but you can add or remove columns as you requirerequired.
- Each heading is on its own row. A common error is to start subheadings on the same row as the heading, but some tree-testing tools will get confused by this.
- The Task column lets you us pencil in ideas for tasks you’d we’d like to use to exercise a particular part of the tree. By writing tasks here in the tree, it also provides a quick way to check which parts of the tree you’re we’re testing. For more on this, see the Writing Tasks chapter Chapter 7 - Writing tasks.
- The Notes column gives you us a place to jot down comments, issues, or to-do’s for later work. If a note is particularly important (e.g. you we think it should be discussed at your our next meeting), we color-code its cell to make it stand out.
- Add your own We can add more columns as needed. For example, if you’re we’re dividing up work with others, you we may want to add a Who column to track who’s responsible for each section of the tree.
For the remainder of this guide, we’ll use the spreadsheet method, although these ideas should be easy to adapt to other methods as well.
Sourcing the tree
If you’re we’re dealing with a small tree, and you we don’t already have it in a form that can easily be converted to a spreadsheet or text file, it’s sometimes easiest to just type it manually into your our spreadsheet.
However, most tree testing is done on not-small sites, where findability becomes a real problem to solve. For these sites, typing the site structure manually is tedious. It’s usually better to find an existing map of the site and figure out how to convert it to the format you we need.
To the best of our knowledge, there is no standard file format or schema for mapping site structures. (Even Google's sitemap file format does not include hierarchy information.) Because of this, importing your our existing tree depends on where it’s coming from:
- If you’re we’re using a Content Management System (CMS), there is usually a way to dump the site structure to a file – ideally to a spreadsheet or CSV file, but even a plain text file is better than starting from scratch. From there, you should be able to we can then copy/paste the content into your our spreadsheet and massage it into shape.
- If the CMS exports a tree structure, check that it matches the actual hierarchical navigation of the site. (In some CMS's, the menu structure and the CMS structure can differ.)
- If the CMS gives you the option of exporting provides an option to export page titles or link names, choose the latter because they are what users see when they're deciding where to click.
- Many designers model their site trees using mind-mapping software (Mindjet, FreeMind, etc.) because of its ability to quickly build, revise, and visualize a hierarchy. Like CMSs, these programs typically provide a way to export the map to a text file using indentation, which you we can easily import into a spreadsheet.
Using the right format
Whichever tool you we use to create and edit your our site tree, you'll we want to make sure that it can eventually be imported easily and reliably into your our tree-testing tool.
Luckily, the format itself only has 1 major rule:One heading per line
| Right | Wrong |
|---|---|
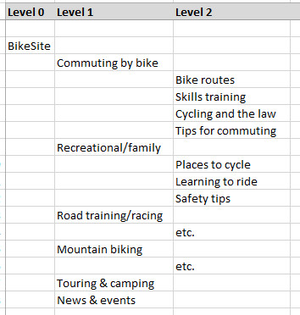 |  |
Many first-timers make the mistake of putting the first subheading of a section on the same line as the section's heading. This makes it harder to move around subheadings while youwe're revising, and may cause problems when importing to your our tree-testing app.
Importing the tree will can save you a lot of typing, but it’s not a silver bullet. You’ll We’ll still need to check your our tree for link-name discrepancies and for problematic or missing content, which we describe in the remainder of this chapter.
...